
Sometimes we need to run or sync QuickBooks company files between two computers. It is very easy with QuickBooks Online because in QuickBooks Online we can access company files from any device. But with QuickBooks Desktop, it is a little difficult to synchronize the file. To make it simple, here we have the article for you. In this article, you can gain the idea that how to sync QuickBooks files between two computers.
Steps to Sync QuickBooks Files Between Two Computers
This process needs 3 steps to complete, we have described the procedure in below, but before that here are some tips for you, which are necessary before syncing any file to computers.
Before syncing the files, you need to make sure that there is the correct installation option for each computer and both the computers are connected on the same network or you can also uninstall QuickBooks on both the computers and then reinstall them with the correct options.
When the reinstallation and configuration will be completed on both devices then the host desktop allows you to synchronize the data with other computers connected to the device on a network. Sync QuickBooks files and data help you in different ways of achieving the thing that you want and need.
Step 1: Share a Company File Between two Computers
- First of all download, and install the transfer utility provided by Utility.
- Now attach your company file to the original computer from the secondary computer.
- You can also save the company file to an external disk or to the source system over a network.
- From the secondary computer, select the ‘File’ menu, and open a company file. After that, select the ‘Open Company’ option.
- Select the ‘Open Source Company ‘ button from the data transfer utility, and click on the ‘Export data from the source company’ option.
- Select the ‘Yes and permit access even if QB is not running’ option to get permission for the application to access the personal information. Select the ‘Continue’ option, ‘Yes’ option, and the ‘Done’ option in QuickBooks.
- Go to the ‘Currently Connected To’ field, and select the ‘Close’ option.
- Visit the ‘File’ menu, and select the ‘Close Company’ option in QuickBooks.
- Again go to the ‘File’ menu, and open the ‘Open destination company’ of the disk transfer utility.
- Select the ‘Yes, Always permit access even if QB is not running’, allow the application for personal data processing.
- Continue it, click ‘Yes, and then ‘Done’ option.
- Close it, and choose the ‘Close company’ option from the file menu.
- After that, select the type of data, and change it to a data transfer utility.
- Here you need to choose the best options according to your needed destination file.
- At last, go to the ‘Data Transfer Utility’, and select the ‘Import data into Destination’.
- Select the ‘Import Data’ option.
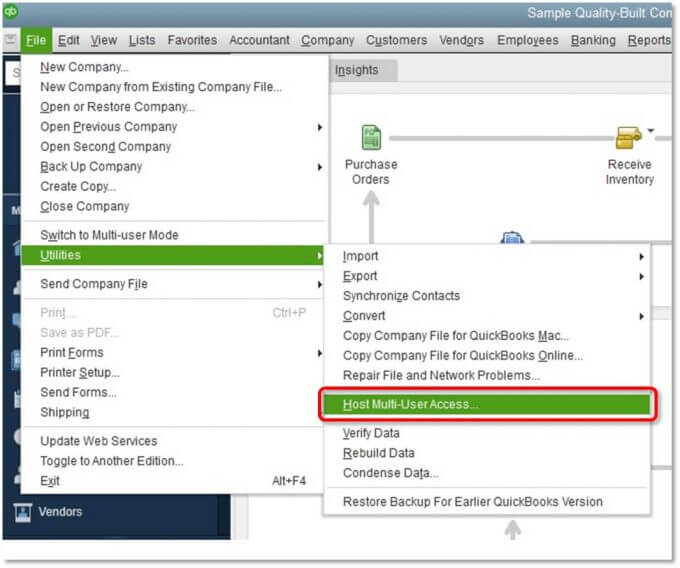
Step 2: Share QuickBooks Desktop Version
You have completed the sharing process of company file, now share the Desktop version between the two computers.
- Click “File”, “Utilities” and “Host Multi-user access” in QuickBooks on the primary computer.
- After confirming as the host, follow the steps.
- Open the start menu and type the database on the server computer.
- Click on the QuickBooks Database Server Manager.
- If no folder locations are shown, click Browse and browse to the folder where you store your company file(s).
- Click OK, and then the ‘Start Scan’ option, which will repair the firewall permissions to allow QuickBooks to communicate over your network and resolve your error.
- When finished, click Close and try opening QuickBooks in multi-user mode on your workstation(s).
Other Useful Resources:
Set Up QuickBooks Email Service with Outlook & Webmail
QuickBooks Workforce Sign In to the Employee Portal
Login to Intuit QuickBooks Merchant Services Center (Payment Solution)
Step 3: Set Up the Data Server for the Synchronization
- Click the “Scan Folders” tab, “Add Folders” and “Scan” to scan the primary computer for the QuickBooks company file, click “Close” once you have verified the company file has been found
- Click the “company” menu, then click “Set up Users and Password” and “Set up Users” within QuickBooks on the primary computer
- Then click “Add User” and assign a username and password. Select your access options for the secondary computer and click “Next”.
- Select the options for changing or deleting transaction permissions. Click “Next and Finish”
- Click “File” and “Open or restore company” and “Open a Company” in QuickBooks on the secondary computer. Browse to the location on your network where the primary company file is stored. Select the file then “Log in” with the username or password created on the primary computer.
It was the procedure to sync QuickBooks files between two computers. Apart from that, I have another video suggestion for you that will help you to share QuickBooks files. Have a look;
Wrapping Up
Synchronization of company files in QuickBooks is a big process, but not a difficult process. You can complete this process by following the above-given steps carefully. Hopefully, you find the article helpful, and informative. Still, if you find any difficult to perform this then you can contact us. Our Enterprise expert team member can help to clear all kinds of doubts related to the topic.