
Displaying H101, H202, H303, or H505 errors while accessing the company file in QuickBooks? Want to know what are the causes and how to get rid of this H series error? Relax in this article, you will get answers to all of your questions and you will be able to rectify your errors by following the mentioned instructions.
What is QuickBooks H Series Error Codes
QuickBooks H series error codes often occur when you switch into multi-user mode. QuickBooks errors H101, H202, H303 and H505 oftenly arise due to the network issues. This means there is something that prevents the server from using multi-user mode. The H series error codes are the most common errors and display when you try to access a QuickBooks company file from another system. It is important to fix the error as soon as possible to avoid future damage to your company files.
There are some reasons discussed here for the H series error.
Why H Series Error Code Occurs in QuickBooks
- If QuickBooks tried to build a connection to the QuickBooks company files, however, it would be unable to communicate with the server.
- When a wrong hosting configuration setting has been done or turned off.
- If the QuickBooks firewall ports are set up incorrectly then Windows firewall banned the passage of incoming & outgoing services to the QuickBooks company files.
- The configuration of the .nd file is damaged which allows QuickBooks to access company files in another network.
- Incorrect DNS settings would be the other reason for the H series error.
- QuickBooks services like QuickBooksDBXX or QBCF are not started.
- QuickBooks Database Server Manager is unable to find the IP address of the host computer or using a wrong IP address.
- When QuickBooks Firewall setting block to access files or it blocks the outgoing and incoming connection.
Signs of QuickBooks Error H101, H202, H303 and H505
We discussed the various causes of the error H101, H202, H303, and H505. Now we will know about the signs they show and what their effects are.
- The error appears on the screen and crashes the active program window.
- System crashes continuously while running the same program.
- Error code messages pop up on the screen.
- The system freezes frequently for a few seconds.
- Slow response of windows or windows doesn’t respond to inputs of keyboard and mouse.
How to Solve QuickBooks H Series Error Code
Following are some ways to fix the QuickBooks Error H101, H202, H303, and H505:-
Solution 1: Run QuickBooks File Doctor (In Server)
Make sure to download and run the QuickBooks File Doctor Tool on the server system. This is important to fix the H Series error code and the QuickBooks multi-user Hosting Errors. You can download it with or without a license. Now follow the steps shown below-
- Go to the “File” menu and enter “File Doctor”.
- Find “QuickBooks company files” on the server if it doesn’t show in the drop down list.
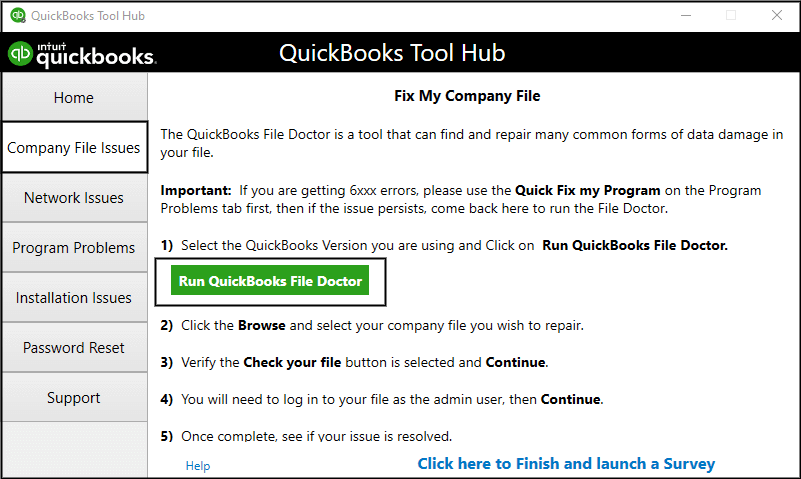
- Choose the “Check your network” icon & tap on the “Continue” tab.
- On the host system, choose the “Server” icon.
- Once you receive the notification related to the sharing folder, click on “Yes”.
Solution 2: Verify the Hosting and Services
Follow the given steps to verify the hosting and QuickBooks services.
Verify The Hosting
- Go to the “File” menu on every computer except the host system. Select the “Utilities” tab.
- If the Host Multi-User Access icon is available on the list, that means this system is not operating the company files. You can move to another system.
- If you see the “Stop Hosting Multi-Users Access” icon, then pick it.
- In the company, the File must be closed windows. Click “Yes”.
Verify The QuickBooks Services
On the server system, operate QuickBooks services like QuickBooksDBXX and QBCFMonitorservice in the multi-user mode.
- Press “Window+R” keys to open the run command.
- Type “Service.MSC” in the run box and click the enter tab.
- Scroll down & find the “QuickBooksDBXX” Service. If you didn’t find “QuickBooksDBXX” Service, look at given points
- If you are using the Database Server Manager only, make sure QuickBooks Database Server Manager is installed on the server.
- If you run the full program on the server, ensure to enable hosting in the QuickBooks.
- Select the “QuickBooksDBXX” and confirm that the “Startup type” is set up to “Automatic” and service status is “Running”
- Choose the “Recovery Tab”.
- Click on the “Save the changes”.
- Repeat all steps for “QBCFMonitorService”.
- Now open your QuickBooks in the multi-user mode on each workstation.
Solution 3: Firewall Settings Configuration
Uninstall the AVG program to modify the windows defender. After that follow the steps to configure the firewall settings:
- Open “Windows firewall settings“.
- Right-click on the “Outbound Rules” and then select “New Rule“.
- The next step is to opt for the “Ports” option, click on “Next“.
- Select the “TCP” and the specific local ports box.
- Click on the “Next” and Select “Allow the connection”
- Select “Next” and enter a name in the name field after you move to the next page, now click on the “finish” option.
- Follow the same steps for “Inbound rules“.
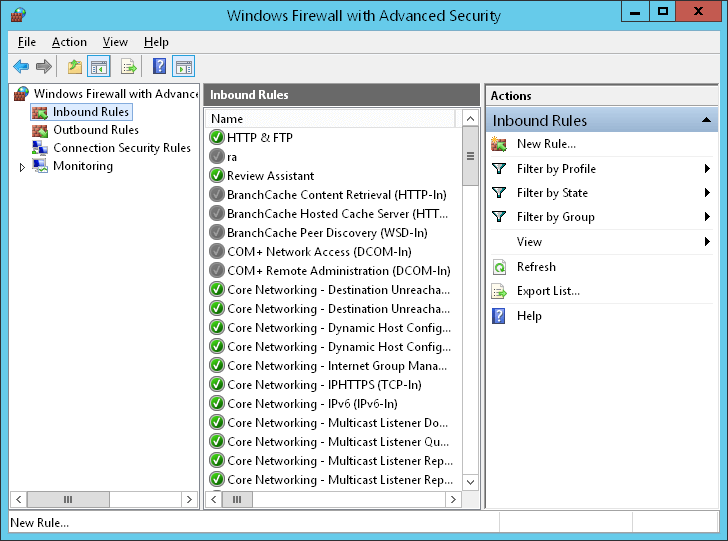
- At the end, open QuickBooks in “multi-user mode“.
Solution 4: Create a New Folder for your Company
Create a new folder for your company to rectify the error.
- Before proceeding, create a new folder and share it at the hosting computer.
- Set windows to get the entry to permission to share your company files.
- Copy the “.qbw file” to the new folder.
- Finally, open your company files in Multi-User Mode.
Other Useful Resources:
How Long Do QuickBooks Payments Take?
Solution 5: Run QuickBooks Database Server Manager
Install QuickBooks Database Server Manager on the system as it creates a connection between the server and other connected workstations.
- Click on the “Start” button and type “database” in the server system.
- Select QuickBooks Database Server Manager.
- If the folder location doesn’t show, click on the “Browse” icon and search the QB folder where you store your company files.
- Select the “OK” tab and click on the “Start Scan” option.
- After completing the scanning process, hit the “Close” icon.
- Lastly, open your company files in Multi-User Mode.
Solution 6: Rename the .TLG and .ND File
Rename the .TLG and .ND file from your company file folder.
- Close the QuickBooks accounting software on all systems.
- Now, open the company file folder on the server system.
- Find and select the.TLG file linked with the QuickBooks file having this error.
- Right-click the.TLG and then rename it. Add “OLD” before the name and click on the Enter button.
- Now, repeat the same steps for the .ND file, and close QuickBooks company file folder.
- Now, open the company file and files will be created automatically.
Solution 7: Ping the Server
Follow the steps mentioned below to Ping the server.
- Open the run command and type “CMD”.
- Hit the “OK” tab.
- You need to “Ping the Server” from the workstation.
- Now type “ping [servername]“ and hit enter. Remove the brackets while performing the actual steps.
- Follow the same steps to all the systems having the same issue. If you are getting a slow reply, it might be some network issue and needs repair.
Solution 8: Use QuickBooks Connection Diagnostic tool
If you are still facing the same issue after trying all the methods, you should follow this method. Have a look on the steps.
- Download and install the QuickBooks Connection Diagnostic Tool.
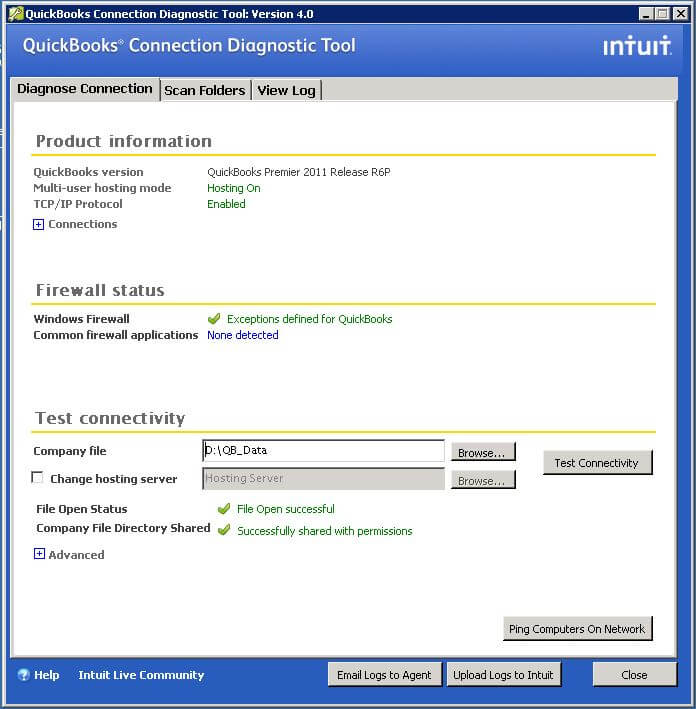
- Run the tool and scan the QuickBooks company file folder.
- In the next step, take note of the IP address.
- Enable the ports, it opens the ports tab option in the firewall status section.
- Follow the “Wizard instruction”
- In the last step, open the file and check if the error still persists.
With this article, we hope that now you understand the methods and are able to resolve the QuickBooks errors H101, H202, H303, and H505. If you still find it difficult to resolve the errors or have another query, you can get instant help by contacting our QuickBooks ProAdvisor through the toll-free number.