
Although we always drive our car as safely as possible we still get car insurance. Ever thought why? It is because the insurance is extremely important to have a backup that can help us in critical situations. Similarly, it is very important to recover your financial data to run your business successfully. QuickBooks Auto Data Recovery tool offers you the same benefit you need: it retrieves your data with a proper mechanism. With this tool, you can restore all your transactions and company files that are lost due to some mishappening. Even though you may be very cautious about your data, errors do tend to happen, either on your part or through the software. This tool enables you to restore as much of the data as possible under the circumstances and has been in QuickBooks applications since its 2012 edition.
It is relatively faster as a way to reclaim your lost data through the QuickBooks auto data recovery function. However, it is only recommended in case the other solution methods don’t work, as a final resort. This is because there are other simpler solution methods that you have to apply first so that you may not have to utilize this characteristic at all.
Note that, the QuickBooks auto data recovery tool only exists in QuickBooks Premier, QuickBooks Enterprise, QuickBooks Pro, and editions of QuickBooks (the Microsoft Windows edition)
Points To Remember-
- It is not available in the QuickBooks Accountant edition.
- There is a data file size limitation of 1.5 GB, which means only data within this range will have an ADR file created for it. Otherwise, there will be no backup data file for your data.
- It works best when your software is upgraded regularly.
Functions of QuickBooks Auto Data Recovery Tool
When it comes to a backup plan excuses don’t work. We need to be sure that our backup is perfectly good. That’s why QuickBooks takes the backup of the files automatically. Here’s how it works-
- If any company files are altered then the QuickBooks Auto data recovery tool performs the internal diagnostics on that file.
- And a backup copy of it is made into the ADR folder.
- The ADR transaction log will contain all transactions added to the file from the point when the initial copy was made.
- After every 12 hrs, QuickBooks makes a new backup and now two files exist, one of the 12hrs ago and another of 24hrs ago. The older copies are deleted automatically. ( Updation of backup occurs when QuickBooks is opened.)
As you know how it works so now let us learn how to restore your data.
Other Useful Resources:
Manage, Set Up and Track Inventory in QuickBooks Online
Fix QuickBooks Error H101, H202, H303 & H505 (Multi-Access Issue)
Procedure to Use Auto Data Recovery in QuickBooks
There are 2 ways you can restore deleted QuickBooks data files, you have to first know the two ways in which it works:
- ADR tool utilizes your current data transaction log file and a copy of the company file to restore the lost transaction.
- It also restores all the transactions except those which are done in the last few hours. And, In this case, it uses a copy of both files, the transaction log file, and the company file.
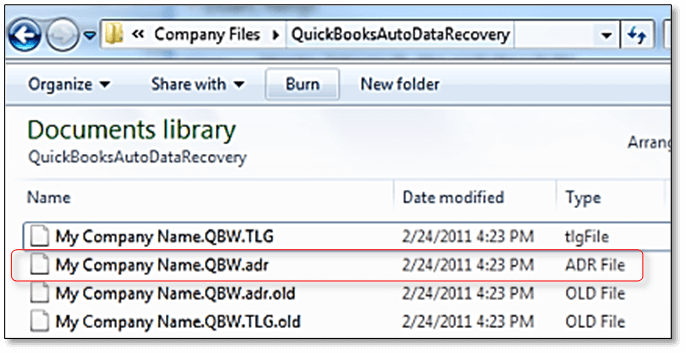
Method 1: Use .TLG file with .QBW.adr File to Recover Files
These are some good ways to restore your transaction data with the help and support of the QuickBooks auto data recovery:-
- Move to the Desktop and make a new folder there. Name it “QuickBooks Test”.
- Search the location of your business company file by clicking the number key 1 + control keys at the same time or just press the F2 key.
- Once you have found the business company file’s folder, watch for the .tlg file that has the same name as your business company file does.
If you cannot find any such file, follow the good Steps (a) through (e):-
a. First of all, Press the Windows + E.
b. The file explorer drive opens, where you have to press Organize and then “Options”.
c. Choose the View button located on the menu-bar and pick the File Name Extensions.
d. Highlight the Hide Extensions for Known File Types option that is on-site available.
e. Apply the changes that you have done and then press the OK button.
Once you have located the data file that has been already mentioned, proceed with these simple and easy characteristics in the QuickBooks Auto Data Recovery process- - Copy the .tlg data file and paste it into the new folder that you had named “QuickBooks Test”.
- Move back to your made folder that contains the business company file. Then select the new folder named QuickBooks Auto Data Recovery.
- Copy that edition of the business company file that has the ADR extension, and pastes it into the folder opened in Step 1.
- Move to and change the name of the .QBW.ADR file to just show .QBW.
- Press on the QuickBooks Application to open it and open the business company data file that you had saved in the QuickBooks test folder on your desktop system. You can check that all of the payment transactions exist with the help of the QuickBooks Account Register.
- If once that is a process done, press “File” and then “Utilities”.
- Press on the “Verify Data” option which will confirm the complete data integrity of the company data file. If the check completes and the copy is safe. Simply go to the other company file, which was damaged, to a various, unrelated location, and replace it with this newly created and checked copy.
Method 2: Use .QBW.adr and .TLG.adr Files to Recover Recent Files
This is another method for recovering your data, which uses the QBW.adr as well as the TLG.adr files. You can follow this method through the steps given below-
IMPORTANT NOTE- You can only restore all of the data before the previous 12 hours. But nothing during these previous 12 hours with the second solution for QuickBooks Auto Data Recovery.
- Right-click on the desktop system to make a new folder which you can name “QuickBooks Test”.
- Move to your business company file’s location folder and watch for the “QuickBooks Auto Data Recovery” folder there. You can locate this folder utilizing the press F2 or Ctrl+1 keys.
- In the QuickBooks Test same folder, find the TLG.adr and the QBW.adr files. This will be easy and simple as they both have the same name edition, just various to first extensions. If you cannot locate these, follow step (a) to (e) mentioned in solution 1 in the same way.
- Use the Copy and paste option to these two files into the desktop system folder named QuickBooks Test. Change the name of these two files QBW.adr file to QBW and the TLG.adr file to TLG. Open your QuickBooks application and then move to the File section on the menu-bar option.
- Press on “Utilities” and then “Verify Data” to ensure data integrity. Once you have proven, change the place of the older business company file with this one.
We hope you found the content useful. If you want any further help regarding the matter then call our toll-free QuickBooks Support Number at +1-850-203-4458. And if in case you have any other doubts besides the above steps or procedures, you can tell about your problem to the customer service team. Our highly skilled professionals will guide you on the way to get out of the problem. Contact us for any queries.