
We are well aware of the golden rule of accountancy that states the amount credited should always be equal to the amount debited. But sometimes, the users enter incorrect information about the transaction. This causes them to re-do the whole process that ends up consuming time. This issue can be avoided by simply creating Journal Entries in QuickBooks Online.
Generally, journal entries are the recording of transactions that help create the ledger. The benefit of journal entries in QuickBooks is the ability of the user to adjust the transactions after making the entries. Also, the whole process is very easy. But, it is important to note that you can only make a single entry for a particular customer at a time. However, if you wish to have multiple users, you will have to post separate entries.
What is Journal Entry in QuickBooks
As a Quickbooks user, you might have entered incorrect transactions in your data. To rectify this mistake, you have to make changes to the original transactions. This can be simply done by entering a journal entry in Quickbooks. QuickBooks Online feeds transaction history as a journal transaction. If you don’t know what a journal entry is, it shows account transactions and consists of two parts- debit and credit.
One account is debited with the same amount another account is credited in a single journal entry. Also, the journal entries are recorded to make balance sheets, income and expense statements, etc.
When entering certain data, Quickbooks automatically puts that transaction into the journal ledger. So, if you want to enter a transaction manually or correct a mistake made earlier you have to use the journal entry feature in Quickbooks Online.
Where Journal Entries are Needed
- Transfer money between income and expense accounts.
- Send money from an asset, liability, or equity account to the income or the expense account.
- Rectify the error by making a journal entry.
- If you want to insert debits and credits side in the journal or the ledger accounts.
Points to Know Before Creating Journal Entries in QuickBooks
Journal entries for QuickBooks are complete for income tax provisions, depreciation entries, and loan interest arrangements. There are certain terms and conditions to create journal entries. The prescripts are given below:-
- Include one account receivable or account payable type account in all entries.
- Utilize accounts receivable or accounts payable account on the second line of the journal entry.
- Entry to accounts payable type or the account receivable will require a consumer or vendor.
- Do not create journal entries to inventory lists or payroll accounts.
- Quickbooks online doesn’t support multi-currency.
How to Create Journal Entries In QuickBooks
Follow the steps given further to know how to create a Journal Entry in QuickBooks.
- First, move to the top of the window and choose the ‘Plus icon’(+).
- Then, select the Journal Entry option.
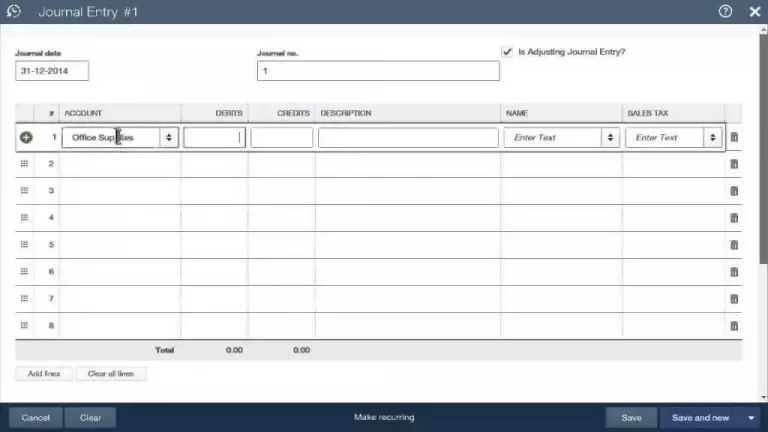
- Fill in the Transaction Date in the Journal date Area.
- Next, insert a Journal Number of the transaction in the sheet which will help you identify the transaction. Then, fill in completely the first distribution line-
- Accounts – The accounts inside the chart of accounts are meant to be filled.
- Debits or Credits – Manually, the first in line are debits. You can look for the transactions in the previous transaction report. View if debit has changed as per the choice or after you have saved the transaction.
- Description – Enter a description to view transaction details report sheets.
- Name – Select a Customer, Vendor, or employee-related to the line if there is any other.
- Enter all the other details which you think are suitable or usable for future reference.
- If the total of the debit column entries does not equal the sum of column entries, then continue to completely fill in the Distribution line until the total of both transactions is equal.
- Next, choose to create a recurring Journal Entry Schedule if it is optional.
- Finally, select Save and new if you want to add another journal entry otherwise choose to save and close to finish the Transaction.
Import Journal Entries in QuickBooks Online
You can import Journal Entries import from the text files or Excel spreadsheets directly into QuickBooks online with the Quickbooks import feature.
Note: For easy and smooth working, turn off account numbers before you begin importing your journal entries. The account numbers can be turned back on once your import is finished. Following are the simple directions to Imports Journal Entries in QuickBooks Online.
Step 1: Prepare Spreadsheet Before Importing Data
If your spreadsheet has new accounts, be sure to add them to your chart of accounts before importing. Make the column heading as required:
- Journal Number
- Journal Date
- Account Name
- Debits
- Credits
- Select date format
Other Useful Resources:
Sage Accounting Software | Features And Uses
Resolving Error 6150: QuickBooks
Fix QuickBooks Error 6123, 0 (The Company File Update Issue)
Step 2: Import The Journal Entries
- First, go to the Settings, then choose Import Data.
- Next, choose Journal Entries.
- After that, on the Download page, select Browse. (Note: Download a sample file if you need help formatting your journal entries.)
- Choose your CSV or Excel file which you have prepared earlier. Open it and click on Next.
- Also, map your information. The most important direction in the import is to map your file headers to the QuickBooks area in ways 3 of the import. Some key ways below:
- You want to locate our file headers in the Excel Transaction area. This mapping will give us the ability to import transactions properly into the QuickBooks business.
- In the locating display, we have the Preview Mapping button which can support you to visualize your time mappings as per the QuickBooks display with your file headers.
- Your field represents the headers on your spreadsheet. So, from each small arrow icon, select the one that matches a field in QuickBooks Online.
- Then, select Next. If an error occurs, edit the file and retry.
- Finally, choose Start import and hit Done.
Once you’re done, you can use the search function to check and edit the journal entries.
Exporting Journal Entries In QuickBooks Online
- First, reach out to the Accountant menu.
- Then, choose Send General Journal Entries.
- Either select from the Dates drop-down or enter the appropriate date in the From and To dates to filter the list of Journal Entries. If Journal entries are not current then:-
- Insert the Journal entries and then save entries.
- Choose transfer GJEs.
- Checkmark the box next to the Journal Entries you want to export.
- Send the Journal Entries to the recipient (where you want to import the transactions).
- Next, choose Email as an Attachment to send the Journal Entries now.
- Finally, click on Save as File to save the Journal Entries as a .QBJ file which can be attached to an email or transferred to portable media.
- You have successfully exported the journal entries.
Edit The Journal Entries Before Transferring
Although this is optional, if you need some alterations in your entries, follow the ways shown below to edit journal entries:-
- First, choose the link in the accountant column.
- Move to create a general entry window and upgrade the entry.
- Next, choose to save and close.
- If you need to verify that your recipient imports all journal entries, not check the enable recipient to choose which GJEs to post to the file box.
- Press on the email as an attachment to transfer the journal entries now.
Here we have a suggestion video, that will give you visual guidance to create, and use journal entries in QuickBooks Online. Have a look;
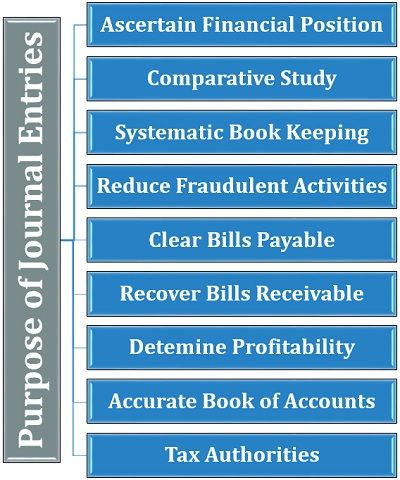
The blog talks about Journal Entries in Quickbooks Online, how to create, import, and export the entries. Also, why the journal entries are created. But if have any doubts, you can call us on our QuickBooks support toll-free number to resolve any doubts and problems related to journal entries. Our QuickBooks experts and ProAdvisor are available 24*7. They will guide you through everything. You can also contact us if you have any other queries or issues related to QuickBooks.